 |
| Ricotta made from whey |
|
|
|
|
|
Last night we made a second cheddar, this time using lipase to create a stronger flavor.
As promised from my last post,
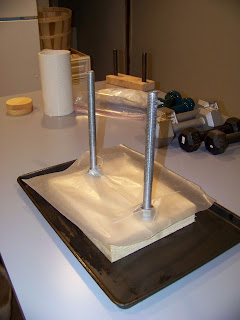
Goat's Milk Cheddar, Our First Hard Cheese, here are some of the photos from our "weight system", The Leaning Tower of ...wait for it...Cheeza! Ha! (Please don't unsubscribe, I'll try to stop...but it's a problem I have, over use of "cheesy" puns...oh no...I did it again...)
 |
| The press with 30 pounds |
 |
| Then 50 pounds |
 |
| Inside the pot, every dumbbell we own |
 |
| Then filled with water, about 50 pounds total |
Anyway, after we made the cheese, we had two gallons of whey (which we stupidly THREW AWAY last time). I cringe now at the thought. Especially after I read all the health benefits of using whey in cooking, feeding it to your dogs, chickens, baking bread, or...best of all...making this delicious Ricotta.
Again, the recipe comes from the Ricki Carroll book
Home Cheese Making.
Super, super simple recipe, with absolutely divine results. We didn't use the "Goats Milk Ricotta" recipe because we had used all of Esther's milk for the cheddar and it calls for additional milk to be added to the whey. I wanted cream for coffee in the morning. (priorities right?) So we used the "Ricotta From Heaven" recipe, and let me tell you, it is aptly named.
To make this ricotta, we simply heated the whey until it got an opaque film on the top, about 30 to 40 minutes. Ricky Carroll calls it a "foam" but ours never really appeared that way. (Maybe we did it wrong, but it was so good, I'd do it this way again!)
Then we strained it through a cheese bag.
I salted it, thought the recipe doesn't call for salt, and we were eating it warm by the spoonful. Oh my gosh, hands down BEST ricotta I have ever had!
I kept the whey yet again, and I am planning on feeding it to the chickens. Look for a future
Community Chicken's post on whey and chickens.
More Cheese photos below.
 |
| Straining the curd |
 |
| The curds |
 |
| salting the curd |
 |
| pouring the curds into the cheesecloth |
|
|
 |
| Prepping the mold with wax paper |
 |
| the cheese goes into the mold |
 |
| all the way down |
 |
| then the top block of the press |
 |
| we use a mason jar as a spacer |
 |
unveiling the cheese to be turned and re-dressed
|


Wow Jennifer, I am just AMAZED and IMPRESSED at the learning processes you are sharing on your dairy and cheese attempts. I don't (yet) have goats because the whole idea is a bit intimidating but am really captivated by what all you've been able to do with them. I've learned a lot in one hour here (more than the whole past year of stopping on any goaty blog posts), and feel a lot more confident about the idea of 'going for it', and that the rewards for the efforts will be so worth it. Your blog posts will enable me to share quickly with my husband and thus convince him it's "a good idea" because it's not only practical but do-able!
ReplyDeleteI thank you for sharing so much of your journey- keep it up please!