Showing posts with label Farm House. Show all posts

Friday, June 3, 2016

Spare Bedroom Remodel

I've been meaning to share these photos with you for over two years now. I keep waiting because there always seems like there's something else I'd like to add/finish before the room is complete and I could unveil the final look.

But seeing that we're expecting our first little girl this October, and this will be her room, I thought I should share what the room looks like now before we end up changing it again for her arrival.

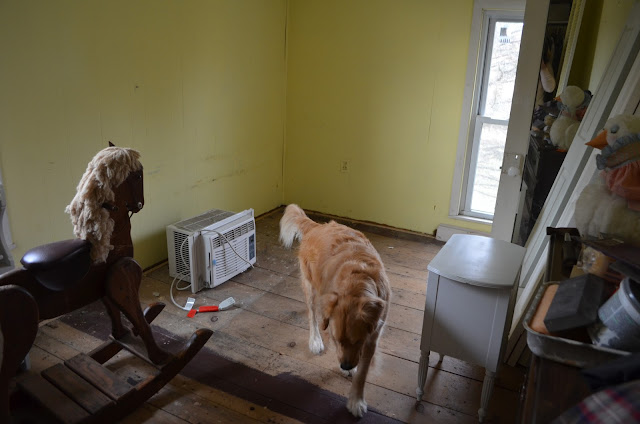
First I'll share the before photos:

Here's a shot from each of the four corners. My mom moved in with us for a while after my dad passed away, so for the longest time, the room served as a spill over storage room for a lot of her stuff that we didn't want ruined in our musty basement.


When we bought the house, the upstairs, including this room was carpeted in a light teal carpeting. When we tore it out, we found old wide plank floors that were too cool to carpet over. However there was a lot of damage and what looked like spilled burgundy paint. Our room also had these floors, but they were too damaged and we decided to re-carpet.

The ceiling was covered in a ceiling tile network, which we tore out, revealing a very damaged ceiling. We cut out large areas of the plaster and repaired much of the ceiling.


We also unveiled a second attic access.
The room was also covered in paneling, which we wanted to remove because the plan was to put bead-board in this room to give it a farmhouse/cottage feel. But bead-board paneling on top of regular paneling would have looked odd so we decided to take out the paneling.

Once we started removing the paneling, we discovered that it was hiding a multitude of plaster and drywall problems. We then had a decision to make, the best thing would have gutted everything down to the studs and start over, but the way our small upstairs is configured, this would have extended the project out to the hall, down the stairs and into our bedroom.

This would have tripled the cost and work involved with the "small bedroom remodel". So we improvised and mudded all the indent lines in the plaster. We sanded and mudded, sanded and mudded until the paneling looked like drywall. It turned out great and you honestly can't tell.
  
Once the room was prepped we began painting, putting up beadboard, wainscotting, crown molding, and new molding around the windows and door.


We also had to drop the split closets down now that the ceiling was higher without the tiles, and to leave space for molding. The windows also needed to be re-framed.

To give the ciling uniformity we used a textured paper that reminds me of the metal apothecary tiles. I think we may also do this in our kitchen. I LOVE the way it turned out.

 And we painted the floor white.


These old brown dressers goat a face lift via some white and grey paint, and some stenciling.

I also found some antique switchblade covers and an old turn-of-the century light fixture that we painted white to match.


And here's the final room!


I found a pack of stencils which prompted a subtle bluebird theme throughout the room.


Some drawings I did for the room.

I also made a rag rug.
To learn how to make this rug or the white pillow on the bed visit the links below.

Rag Rug
Eyelet Pillow

For now, I use the room as a sort of dressing room, but it will soon be transformed into our little girl's room. We're lucky that we're having a girl, as the room has an ultra feminine feel to it. Not much will change, of course the twin bed will be traded for a crib and we'll paint to match the crib bedding. But as she gets older, the twin bed can be moved back in. This bed is actually my bed as a child. It can turn into a canopy which I really enjoyed and think any little girl will think is cool. I plan on turning the long dresser into a changing table, as the small room doesn't have a lot of space for extra furniture. I also have a wicker rocking chair from my bedroom as a girl that will be added.

I'll update as we turn the room into a nursery

Wednesday, February 10, 2016

Magnet Chalkboard Spice Tins

This system of spice tins is one of my favorite things right now. Have you ever had something, whether you bought it, or made it, that just really changes the way you do something for the better? I love to cook, but rifling through our top drawer of our pantry, looking for spices was always something that drove me crazy. The spice jars were too little to be sharing the same space as large bottles of olive oil, vinegars and other random things. They'd get knocked over and lost among the rubble.

These tins have solved that problem for me and I love it. I also find myself using more of a variety of herbs in our meals because I see them, and think..."hmmm, that would be a good addition."

These tins are being stored on the side of our refrigerator, a space that otherwise wouldn't hold much of anything. I'm not a big fan of tons of stuff on my fridge, it gives me anxiety...that's the anal retentive side of me coming out. The magnets we do have are uniform and well thought out. We have magnet poetry on the front, which is alphabetized, and is uniformly black and white. We also have a few acorn and bee magnets which fit our personality.

These tins pass the refrigerator test because they are all uniform and create organization in themselves.

I have them alphabetized so that I can always find the spice I'm looking for, and putting them away after a meal is a snap...I just look for the empty spots. The 8 oz. tin holds a lot of spice. Which is nice for when I dehydrate home grown herbs in large quantities.

They can be re-arranged to allow for new spices, for example I just started cooking with savory for the first time. I simply made a "savory" tin and fit it in alphabetically.

The chalkboard labels can be wiped with a damp cloth and re-labeled.

Here is where you can order the supplies:

8 oz metal tins
2.5" chalkboard labels
chalkboard marker
3"round magnets

Tuesday, February 9, 2016

Homemade Laundry Soap Half Penny Per Load

I've been using this homemade laundry soap for over 6 years and I have no complaints. We live on a farm and Zach is a blacksmith and it gets our very dirty clothes clean every time. I still use a commercial stain spray for tough spots, but I did that when we bought detergent.

I make this soap in our Food Processor. I use the shredding blade to shed the bars of soap, and the mix/chopping blade to incorporate the mixture and grind the soap flakes to a powder.

You Will Need:

1 3 lb. box Super Washing Soda
1 4lb. box Borax
1 16oz. box Baking Soda
2 14 oz. bars Zote soap

You can add essential oils too, but this drives the price up and I feel like I can't really smell that much of a difference once the load is dry. I feel like essential oils might be better used in the dryer or perhaps a fabric softener step if you line dry. I've also used 2 bars of Fels Naptha soap in this recipe. Sometimes the store is sold out of Zote. I prefer the scent and constancy/texture of Zote when I'm making the detergent, but both work fine for cleaning.

Zote comes in pink and white. Both work equally well, but I like the pink because I can tell if the soap flakes are evenly distributed throughout the detergent. But again, this is just a preference. 

I use our large roasting pan and the canning pot to mix everything. You need two large vessels to mix everything.

I start by shredding the soap so it's in a grated cheese consistency.

I dump this in the pot and add all the other ingredients.

I use a large spoon to stir all the soap flakes evenly through the powdered ingredients.

Then, working in batches, I grind the soap flakes with the powder. Each batch gets dumped in the roasting pan.

When all the detergent is ground to powder, I give it a final stir to make sure everything is incorporated. (You'll get some batches that seem to be pinker than others.) This final step mixes it well.

When it's all done I fill a 1 gallon glass jar, plus a half gallon Mason jar.

I use 2 level tablespoons per load and all my load are large loads. (I rarely wash small loads)

I usually get my ingredients at Wal-Mart, it's our closest grocery store. 

Here's the price breakdown:

Washing Soda                $3.97
Borax                             $3.97
Baking Soda                  $0.54
Zote ($0.97 x 2 bars)     $1.94
---------------------------------------
Total:                             $10.42

There are 256 tbsp in a gallon
The recipe makes 1.5 gallons so that's 384 tbsps
divided by 2 because I use 2 tbsp per load, equals 192 loads
$10.42 divided by 192 loads equals $.054 per load

So one half penny per load! 

I recommend that you read the owners manual on your washing machine before using this soap recipe. Or contact the manufacturer to see if powdered soap is ok for your machine. We have an old top load washer and I haven't had any problems.   

Here are photos so you can see the prices at the store:


Saturday, February 6, 2016

DIY Eyelet Patchwork Pillow

When I was a little girl, my mom decorated my room in pale pink rosebuds and white eyelet. It was VERY girly! Lot's of pink...lemme tell ya! I had pale pink carpet, a pink bedspread trimmed in eyelet, eyelet decorative pillows, and pink rosebud wall paper. Looking back on my room, it was adorable. But as I grew up I couldn't help but feel like my room didn't reflect my personality. I was something of a tomboy (much to my mother's chagrin) and my framed shadow boxes of dead insects didn't quite go with the cottage princess look.

I never really went through a rebellious stage, but around age 13 I asked my parents if I could change my room. They agreed and told me that I could do what I wanted so long as I paid for it myself. Fair enough.

I had some babysitting money saved up so I bought a gallon of green paint, like a celery/sage color, a set of tan and green sheets and a tan, cargo style bedspread with big pockets on the sides. I hung a branch from the ceiling and placed several bird nests I had found over the years, along with an empty paper wasp nest. More dead insects went up on the walls, a shelf with my sea shell collection, shelf mushrooms, various pods, seeds, acorns and pine cones, a squirrel skull I found in the woods...photos and drawings of sea turtles, owls and other wildlife, and shortly after my room re-do I got an aquarium for my birthday and a pet Red-Earred Slider. I was kinda obsessed with turtles at the time.

My room looked like a nature center, but I loved it!

I donated all the pink... thinking I would never again re-visit that style. I knew in my heart that I was a nature lover and when I had my own home it would just give me more space to fill with examples of preserved nature. Maybe I could charge admission and give tours like a museum!

Fast forward 20 years and Ive found that while I still love nature, I don't necessarily have to scream it to the world via home decorating. In fact, I've somehow come full circle and love that ultra feminine cottage, shabby chic look. My mom is so proud!

We have an old farmhouse and we've kept the lower level rather rustic with dark stained wood, various antiques and caramel-color painted walls, but upstairs is a totally different story.

We recently remodeled this spare bedroom (I have a room tour coming soon) and we did it in a French Countryside, cottage theme complete with lots of eyelet accessories. To say the least, I am kicking myself for not keeping all the girly room decorations from my youth...but how are you to know?      

Because I couldn't predict the future, I have to find or make new accessories for our spare bedroom, as in the case with this pillow.

It's a white on white, six patch pillow, each patch is 6 by 6 inches.

I treated each patch as its own project.

I started with 6- 6x6 squares of white cotton fabric, then decorated each one with different sewing material.

This square is two strips of large eyelet and two strips of thin eyelet sewn vertically.

This square has a layer of pleating sewn over the straight square. I did a large running stitch with my sewing machine and pulled the end thread to gather.
This is a calico white on white fabric I found.
I did a little embroidery on this square with white embroidery floss.
This square was probably the hardest to make. I used half inch satin ribbon to make a basket weave.
The ribbon kept slipping out of place so finally I used tape to hold it in place. When it was all woven in an over-under pattern, I sewed right through the tape holding the ribbon in place. After it was sewn I pulled the tape off and it worked great!
Then I sewed the squares together with a 1/4 " seam, right sides together, making two rows of three, then sewed the two rows together.
I measured the final patch front and cut a piece of cotton fabric the same size for the back.
I wanted a large eyelet trim so I pinned the trim to the back of the pillow. When I sewed the two sides together, the patchwork side was facing in, and the eyelet trim was sandwiched between the two pieces. 
I left a 5 inch opening to turn the pillow right side out and to stuff it. I stuffed it with loose polly-fill and hand stitched the opening closed.

BlogCatalog