Ok, before we go on...we need to discuss this! I know it's idiotic to try and apply logic to cartoons...I know this,... I do. After all there are usually talking animals and some sort of magic woman turning pumpkins into carriages or fairy's making dresses out of thin air...but this is important!
Now that I know a bit more about spinning wheels, to be honest I have no idea what Disney was talking about. Granted, there are types of spinning wheels with tapered spindles similar to a drop spindle, but you'd be hard pressed to draw blood. I could see maybe a sewing machine, "When the sunsets on her sixteenth birthday the princess will run her finger over with a Sears Singer using the zig zag application stitch and sleep until true loves kiss" Ok, ok so it doesn't have the same ring...but you'd have a hard time drawing blood from any part of a spinning wheel.
Ok, I feel better having that behind us.
Moving on...
When I got my wheel, it was all a bit intimidating. So I'd like to start out describing the different parts and what their basic function is. For those of you who are looking to purchase a spinning wheel, or who might be starting out, hopefully this info will help a bit.
This is my wheel. It's a Kromski Sonata in the Walnut finish. It's a double treadle, which means it has two "pedals" that you pump with your feet. It also folds up into a compact size and has a backpack carrying case. We got it in the heart of Amish country in Lancaster Pennsylvania on our honeymoon. I not only see this wheel as a working piece of machinery, but also as a beautiful work of art and a sentimental heirloom that I hope to pass down to my children.
This is my favorite chair to sit in while I spin. You don't have to have a favorite chair...but it helps. You also don't need dog toys scattered around the room, as shown in the photo...but it helps.
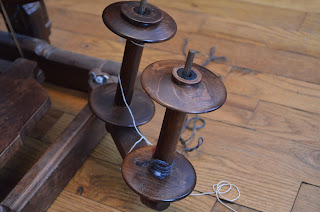
These are the bobbins on the Lazy Kate. Which is the arm that swings out and holds the bobbins. There is a third bobbin...the working bobbin, which I'll get to in a minute.
I tie a bit of store bought yarn on each bobbin, about 2 feet, as a starter yarn. This will be threaded through the wheel and the roving will be spun onto this yarn.
My wheel is a single drive Scotch tension set up. In my opinion single drives are easier to use and have less moving parts. This is the tension adjustment. This knob turns and twines the cord around itself. You can tighten or loosen the tension depending on how much it is turned. The tension needs to be loosened all the way to put a new bobbin on.
The tension cord runs down the length of the working bobbin then loops over the bobbin's end and attaches to a spring (not shown) on the other side. This is the brake band.
The tighter the tension, the more the twisted yarn will want to pull into the bobbin. When you spin, there are two motions going on. The twisting of the fiber which happens outside the wheel, and the action of the yarn being pulled onto the bobbin. The correct tension will allow you to twist the yarn without a constant yanking feeling, but it will have enough pull that the yarn will draw in.
This is the working bobbin with the lead yarn tied on.
To thread the machine, run the yarn up and down the length of the hooks. I always work from back to front.
There are two sets of hooks on either side. It doesn't matter which side you start with.
Then using the threading hook.
Stick it through the orafice.
And hook the yarn on the other side.
Then draw it through. The wheel is now threaded!
I have to take the drive pulley off to get the bobbin on each time. So replace the pulley, which is this translucent stretchy band that connects the treadle to the fly.
Now you're ready to start spinning.
 More spinning posts coming soon! Keep checking back. Gonna try and get some videos up too as so much of spinning is motion oriented.


1 comment:
GREAT!!! I was hoping for a spinning wheel for Christmas, but since I wasn't sure just exactly what kind, hubby opted to get me a beautiful wooden potting table. So I'm researching wheels now! Looking forward to your next post!
Post a Comment