

~Live Simple~
Tuesday, January 31, 2012
Moving the Coop, 40 Chickens, 40 Miles West
Friday, January 27, 2012
Fiery Friday - Aluminum Chisel Plate
Today I'm going to show you how to make an aluminum chisel plate that can be re-used over and over again. For about a year I've been using a piece of aluminum about 6 inches long, 2 inches wide and 3/8" thick to put under any hot steel that I need to chisel or sometimes punch through all the way. Since aluminum is much softer than any of my chisels or punches, when they cut through the hot steel they will easily continue through the aluminum. If it wasn't there then the chisel might hit the face of the anvil and probably put a dent in the anvil and dull the chisel. It's not too difficult to reface a chisel, but I would rather spend my time forging instead. Nor do I want to put a thousand little nicks in my anvil.
The only problem is that over the past year I have sorely abused that piece of aluminum and had actually cut it into three pieces from chiseling onto it so much. So I figured I needed a new one.

Here is what I came up with, it's a big thick chunk of aluminum.
 What I did was melt my original scrap of aluminum I was using along with some cut up pieces of a busted spindle housing from the lawn tractor that just so happens to also be aluminum. I first cut the pieces small enough and put them into a little cup I made a while back to hold some of my chisels and punches. In the forge it went and after a few minutes, I had molten aluminum.
 This picture shows me adding another chunk of spindle housing to the already molten metal. Just below that is the mold I'm about to pour the metal into. It's made from some 1/4" x 3/4" for the sides and 1/4" x 2" for the bottom. I figure it was a bit over kill, but it's what I had on hand. I made sure to angle the sides out just a bit to allow the ingot to be removed easily.
Here is a video of the pouring process. I have to admit pouring liquid metal is rather satisfying.
Thanks again for stopping in.
The only problem is that over the past year I have sorely abused that piece of aluminum and had actually cut it into three pieces from chiseling onto it so much. So I figured I needed a new one.

Here is what I came up with, it's a big thick chunk of aluminum.


Here is a video of the pouring process. I have to admit pouring liquid metal is rather satisfying.
Thanks again for stopping in.
Wednesday, January 25, 2012
Great Blog Alert! Meet Yarn Nerd
I wanted to share one of our customer's blogs with all of you. She is a very talented fiber artist and has a new blog full of wonderful fiber tips, techniques, and some of the most beautiful hand spun yarn I've seen. Can't wait to see what she's got spinning next! Check out her blog at http://yarn-nerd.blogspot.com/, Love the name!
Sunday, January 22, 2012
Feeding Time Problem Solved

But, I'm working on it. I have a hard time allowing "farm" nature to take it's course. I feel like I should be busy doing something to help it along. Then I look at Knit and Purl with their gentle eyes, and suddenly, I know what the vet's talking about. They're not worried. That's why I love animals so much, they have such a calming affect on a spastic worrier like myself.
Whether it's hopeful imagination, or if there really is something going on, I think they are showing some signs of babies. Especially Purl, she looks larger in the tummy area, evenly on both sides. I keep feeling to see if they're making their udders, but not much has changed in that department. I rest my head against their tummys, tying to listen for extra heart beats, but I only hear the healthy purr of a ruminants gurgling stomachs. Its been more in personality that I feel there's something different with my girls. They've been sort of aggressive with food, even Knit, our most docile goat, and they've been eating like pigs.
We've always fed good quality hay, it's a bit more pricy for second cutting, but the goats prefer it, (and I send back bales that aren't green, and ask for another one. (The guy at the feed store sees me coming, and I swear he wants to run in the other direction.) I hate to admit this but, yes, I'm "that" customer. One day he asked, what kind of "horses" I had. I told him it was for goats and he looked at me like I was nuts. My latest thing that has them raising their eyebrows, is my search for sea kelp. (But while we're on this note, if anyone knows of a supplier of sea kelp in large quantities I'd be grateful for the info.)
Anyway...the problem lies in that we need to start feeding different types/amounts of food to each of the goats with different needs. We're also going to be starting a vitamin E supplement as the girls get closer to their due date. With six goats, and possibly six more on the way, we wanted to have more control over our feeding routine, as the routine is now, a stampede of hooves to the grain buckets, and very bad manners. We would also like to start getting our girls more used to a stanchion type setting. Even our buck Sulley will walk on a lead, but none of them have ever been tethered to anything for any period of time. I wanted to get them used to a bit of patience while Zach and I handle them all over, and take care of their needs like milking, hoof trimming, lice inspection, de-worming, checking their rears, eyes etc. So we set up a system that is modeled after Fias Co Farm, a wonderful site by the way, with TONS of information about raising goats. Each goat has their own bucket, spaced a good distance from their neighbor's bucket, with a short lead that prevents them from bullying their way into someone elses dinner. We know exactly what each goat is eating, and the amount. This lets the slower, more timid eaters finish without being shoved out of the frenzy. We lead each goat peacefully to their bucket, once everyone is hooked up, we feed. When everyone is done, they get released. They are ONLY tied up during meal time. We've been placing buckets under them, and handling their udders, in a sort of mock milking routine Not really sure if this is even necessary, as no one seems to mind us touching them, but it feel like good practice for us and the goats. Meal time is no longer this hurried frantic scene. I think the goats are even more at peace as there's no competition to eat as fast or as much as they can. I see them "coming up for air" and actually enjoying their meals, not just inhaling them.
Wednesday, January 18, 2012
Sewing Project, Flat Sheet Curtians


Tuesday, January 17, 2012
Thinking Outside the Pot

Succulents!

What's really great about this nursery is that she sells a great assortment of small inexpensive specimens, but you can browse around and see what these beautiful plants will look like in a couple of years. I had to bring some home and try my best at growing a bit of this wonderland.
I chose 5 different species. But didn't want to just throw them in a pot, they needed something more cozy, more nestling. My mom has this old wooden coke crate, that my dad bought her at an antique store. He was supposed to make it into a doll wagon, but never had the chance. So I adopted it for my plants. I lined the inside with an in expensive, disposable catering tray from the dollar store. Filled the container with some succulent loving soil (a light weight mix with lots of peat), planted the little gems, and to give it an extra woodsy feel, I tucked in a layer of moss around each plant.
Friday, January 13, 2012
New Products!
We've been sooo busy lately. But...we have some new products out that I hope you'll all enjoy.
The first is our new line ~Live Simple~ Farm Tee's! We create the designs, make the screens and print them ourselves. We have lots more T-shirt designs, blogs and videos on the screen printing process coming soon. For now we have our
 Iron Oak Farm Logo shirt available in Men and Women sizes.
 We have the No Bees, No Food available in goldenrod for men,
 and a nice butter yellow for women.

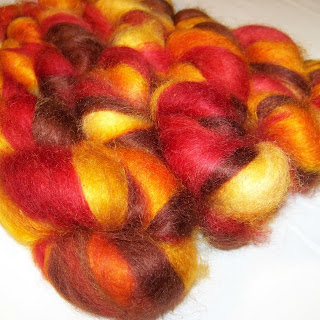
I've also been dying lots of our 100% mohair roving for all you spinners and felters.
 I've been doing large batches so there's more to work with, for larger projects.
 Look for more Troll Owls, I have them made just need to take some decent photos and get them posted. Blessings to all and have a great weekend!
The first is our new line ~Live Simple~ Farm Tee's! We create the designs, make the screens and print them ourselves. We have lots more T-shirt designs, blogs and videos on the screen printing process coming soon. For now we have our

 We have the No Bees, No Food available in goldenrod for men,


I've also been dying lots of our 100% mohair roving for all you spinners and felters.


Tuesday, January 10, 2012
Waiting for the Bees


So for now we wait...We wait for the bees. We wait for frost free dates, and chickens to hatch chicks. We wait for the goats to give birth, heck, we're still waiting to be sure that they're even pregnant. We wait for the mohair and angora to grow, for the sun to warm the earth and force the green pasture above the soil. Nature will know when it's time. Without clocks, or schedules it will happen right when it's supposed to. Our greatest blessing is the gift to be here to witness it.
Friday, January 6, 2012
Screen Printing

The first screen we made was our logo. Zach built a wooden frame from some scrap wood in the barn. Then he made a screen stretcher by stapling a bazillion staples through a thin piece of wood so that the tines of all the staples were exposed. These act as little grips and stretch the screen across the frame. Then we glued it with this apoxy-like glue that almost melts the screen to the frame and make it really secure.
Then we locked ourselves in the spare bathroom where there isn't a window, and worked under the yellow light. While making the screen, it's sort of like working in a dark room for photography. Light exposes the emulsion, that's why I have no photos to share for this part. We applied a coat of emulsion to each side of the screen and let it dry.
Then we printed the design out on two sheets of transparency paper to double the thickness and make sure no light can pass through. We taped the image to the screen and exposed it with an ultra violet light for 12 minutes. This next part is like magic, the area where the image was black rinses away and you're left with a perfect copy in the screen! So cool!


Wednesday, January 4, 2012
Troll Owls, Meet Waldorf

They're made from bits of this and that, things you might find in shadow boxes, button tins, or your grandfather's old desk drawer.
This is Waldorf, he has acorn cap eyes, a scruffy yarn body, a beak made from a Red Wood pine cone, and real feather "owl ears".
They're available for purchase on our Etsy site in the right column of the blog. I have many more to come!
Summer Citrus in January


We got these trees at a local nursery for 50% off. I spoke with a lady at the nursery as to how to care for citrus trees, and it was surprisingly simple.
-Place in a sunny window.
-Water weekly.
-Prune to a shapely size after fruiting.
-Once a month I am to mist the entire tree with a mixture of 1 Tbsp mild dish soap to a gallon of water, as the citrus can attract fruit flys. I use Seventh Generation scent free variety.
-They can be fertilized with an organic fertilizer 4 times a year.
-And they should be taken outside for the summer after Memorial Day and taken in for the winter before Labor Day.

Monday, January 2, 2012
100% Mohair Roving

Sunday, January 1, 2012
Open Faced Egg Salad Sandwich with Dill and Avocado

Subscribe to:
Posts (Atom)